React Native
The SDK provides multiple options for your workflow.
The core react element is ReaderSDKProvider, responsible for managing the SDK's lifecycle. It is crucial to ensure that all operations are performed within this component.
To don't waste resources, the ReaderSDKProvider should be utilized as close as possible to the intended operation.
Additionally, a variety of hooks are available to use within this component, enabling operations like scanning readers, conducting transactions (e.g., payments, returns), and more.
Detailed explanations of these functionalities will be provided in the upcoming sections.
Prerequisites
Before getting started, the documentation assumes you are able to create a project with React Native. If you do not meet these prerequisites, follow the links below
Flipper bug
The latest version of React comes with a version of Flipper (a debugging tool) that does not support the Urovo operating system. Therefore, if you install the application on a Urovo device, the application will crash. Since we don't use Flipper, the fix is to comment out the line that initializes it. This is a temporary fix since there is currently no information about the error.
To "fix" this bug, we need to go to the file android/app/src/main/java/com/demogeopagos/MainApplication.java and comment out the following line:
ReactNativeFlipper.initializeFlipper(this, getReactNativeHost().getReactInstanceManager());
Configuration
-
Request Access Credentials
Contact the Geopagos team to obtain a username and password for accessing the private Nexus repositories where the React Native SDK is hosted. -
Encode Credentials in Base64
Convert your credentials to Base64 using the following format:{username:password}You can use a Base64 encoder or run the following command in a Unix-based terminal:
echo -n 'username:password' | base64 -
Create the .npmrc file
In the root of your project, create a file named .npmrc and add the following content:@geopagos:registry=https://nexus.geopagos.io/repository/geo-npm-hosted-internal/
//nexus.geopagos.io/repository/geo-npm-hosted-internal/:_auth=YOUR_BASE64_AUTH_TOKEN
always-auth=trueReplace YOUR_BASE64_AUTH_TOKEN with the actual Base64-encoded string from step 2.
-
Proceed with Installation
You should now be able to install the SDK and related packages as usual using npm or yarn.
Installation
Install the React Native module to the root of your React Native project with NPM or Yarn:
  # Using npm
  npm install @geopagos/react-native-readers-sdk

  # Using Yarn
  yarn add @geopagos/react-native-readers-sdk
And for each type of reader you want to support (you may choose to support one or more)
- QPOS
- MagicPOS
- Urovo SmartPOS
- MoreFun SmartPOS
  # Using npm
  npm install @geopagos/react-native-qpos-reader-sdk

  # Using Yarn
  yarn add @geopagos/react-native-qpos-reader-sdk
  # Using npm
  npm install @geopagos/react-native-magicpos-reader-sdk

  # Using Yarn
  yarn add @geopagos/react-native-magicpos-reader-sdk
  # Using npm
  npm install @geopagos/react-native-urovo-reader-sdk

  # Using Yarn
  yarn add @geopagos/react-native-urovo-reader-sdk
  # Using npm
  npm install @geopagos/react-native-more-fun-reader-sdk

  # Using Yarn
  yarn add @geopagos/react-native-more-fun-reader-sdk
Configure the SDK
This SDK exposes a provider component that accepts the following properties:
- endpoint (required): is a string with the URL path of the processor URL. Geopagos will provide this URL
- readers (required): is an array of reader installers. According to the dependencies you added
- applicationKey (required): is the application key provided to use this sdk. Geopagos will provide this key, alongside the
- plugins: is an array of plugins installers. According to the dependencies you added
- logger: is a custom logger you can provide to get additional information about what the sdk is doing (is useful for debugging purposes) credentials
  <ReadersSdkProvider
      endpoint={"https://some-endpoint.geopagos.com/"}
      readers={[urovoReader.createInstaller({ profile: Profiles.ARGENTINA })]}
      applicationKey={"SOME_APPLICATION_KEY"}
      plugins={[forcePinDeciderPlugin.createInstaller(true)]}
      logger={sdkLogger}
  ></ReadersSdkProvider>
About installers
Each reader has its own installer. If you have added the QPOS, MAGICPOS, and/or UROVO dependencies as mentioned above, you will gain access to the installer object.
The installer object with the function createInstaller may or may not require parameters, depending on the specific reader being used:
urovoReader.createInstaller({ profile: Profiles.ARGENTINA })qposReader.createInstaller()
Initialization example (supporting Urovo and QPOS)
  <ReadersSdkProvider
      readers={[urovoReader.createInstaller({ profile: Profiles.ARGENTINA }), qposReader.createInstaller()]}
  ></ReadersSdkProvider>
Scan devices
In order to use this functionality, your application needs Location and Bluetooth permissions to be granted.
To initiate a transaction, a reader is required. Therefore, the first step is to scan for available readers.
The SDK provides the useReaderScanner hook specifically for this purpose.
When utilizing this hook, it is necessary to execute it within the scope of the ReadersSdkProvider (which handles SDK initialization).
This hook can accept an optional numeric parameter as a scan timeout in milliseconds. If no value is provided, it defaults to a predetermined value.
The timeout is utilized when scanning Bluetooth devices, whereas SmartPOS reader detection occurs instantly.
The hook will provide you with the following properties:
- foundReaders: This property will be updated during the scanning process with a list of the readers found.
- scanError: In case of any scanning errors, such as lack of Bluetooth permissions, this property will indicate the specific error.
- isScanning: This boolean property informs whether the scanning process is currently in progress or has completed.
- isInitializing: As the SDK initialization process may take some time and the functioning of this hook relies on the SDK being fully initialized, this property allows you to display a loader while the SDK is being initialized.
const { foundReaders, scanError, isScanning, isInitializing } = useReaderScanner(3000)
Permissions
To use the SDK permissions service, the react-native-permissions dependency must be installed in the application we are developing. Since this is included as a "peerDependency" of the readers-sdk package.
yarn add react-native-permissions
To request Location and Bluetooth permissions, the sdk provide a service. This service is a class named RNSdkPermissions.
The class will provide you with the following methods:
- requestBluetoothPermission: This method will request the bluetooth permissions and will indicate the result (Granted, Denied, Unavailable).
- requestLocationPermission: This method will request the location permissions and will indicate the result (Granted, Denied, Unavailable).
- openPermissionSettings: This method will open your settings in order to manually grant permissions.
You have to indicate the platform you are on to request permissions. React Native provide the object Platform that indicates the actual platform.
  const sdkPermissions = new RNSdkPermissions(new RNPermissions())
  const btResult = await sdkPermissions.requestBluetoothPermission(Platform.OS)
  const locationResult = await sdkPermissions.requestLocationPermission(Platform.OS)
  await sdkPermissions.openPermissionSettings()
Create a transaction
To create a transaction, you can utilize the useReadersSdk hook. This hook provides access to the necessary functions.
To initiate the transaction creation process, use the createTransaction function provided by the hook.
This function requires a transaction type parameter, which can be one of the following: sale, refund, or cancel.
  const { createTransaction } = useReadersSdk()
  const transaction = await createTransaction(TransactionTypes.Sale)
To start the transaction, call transaction.start(). This method receives two callbacks:
- onTransactionStateChanges
- onReaderStateChanges
  const onTransactionStateChanged = (transaction: Transaction, state: TransactionStates, params) => {
      // handles transaction state
  }
  const onReaderStateChanged = (state, params) => {
      // handles reader state
  }
   await transaction.start(onTransactionStateChanged, onReaderStateChanged)
Transaction flow states
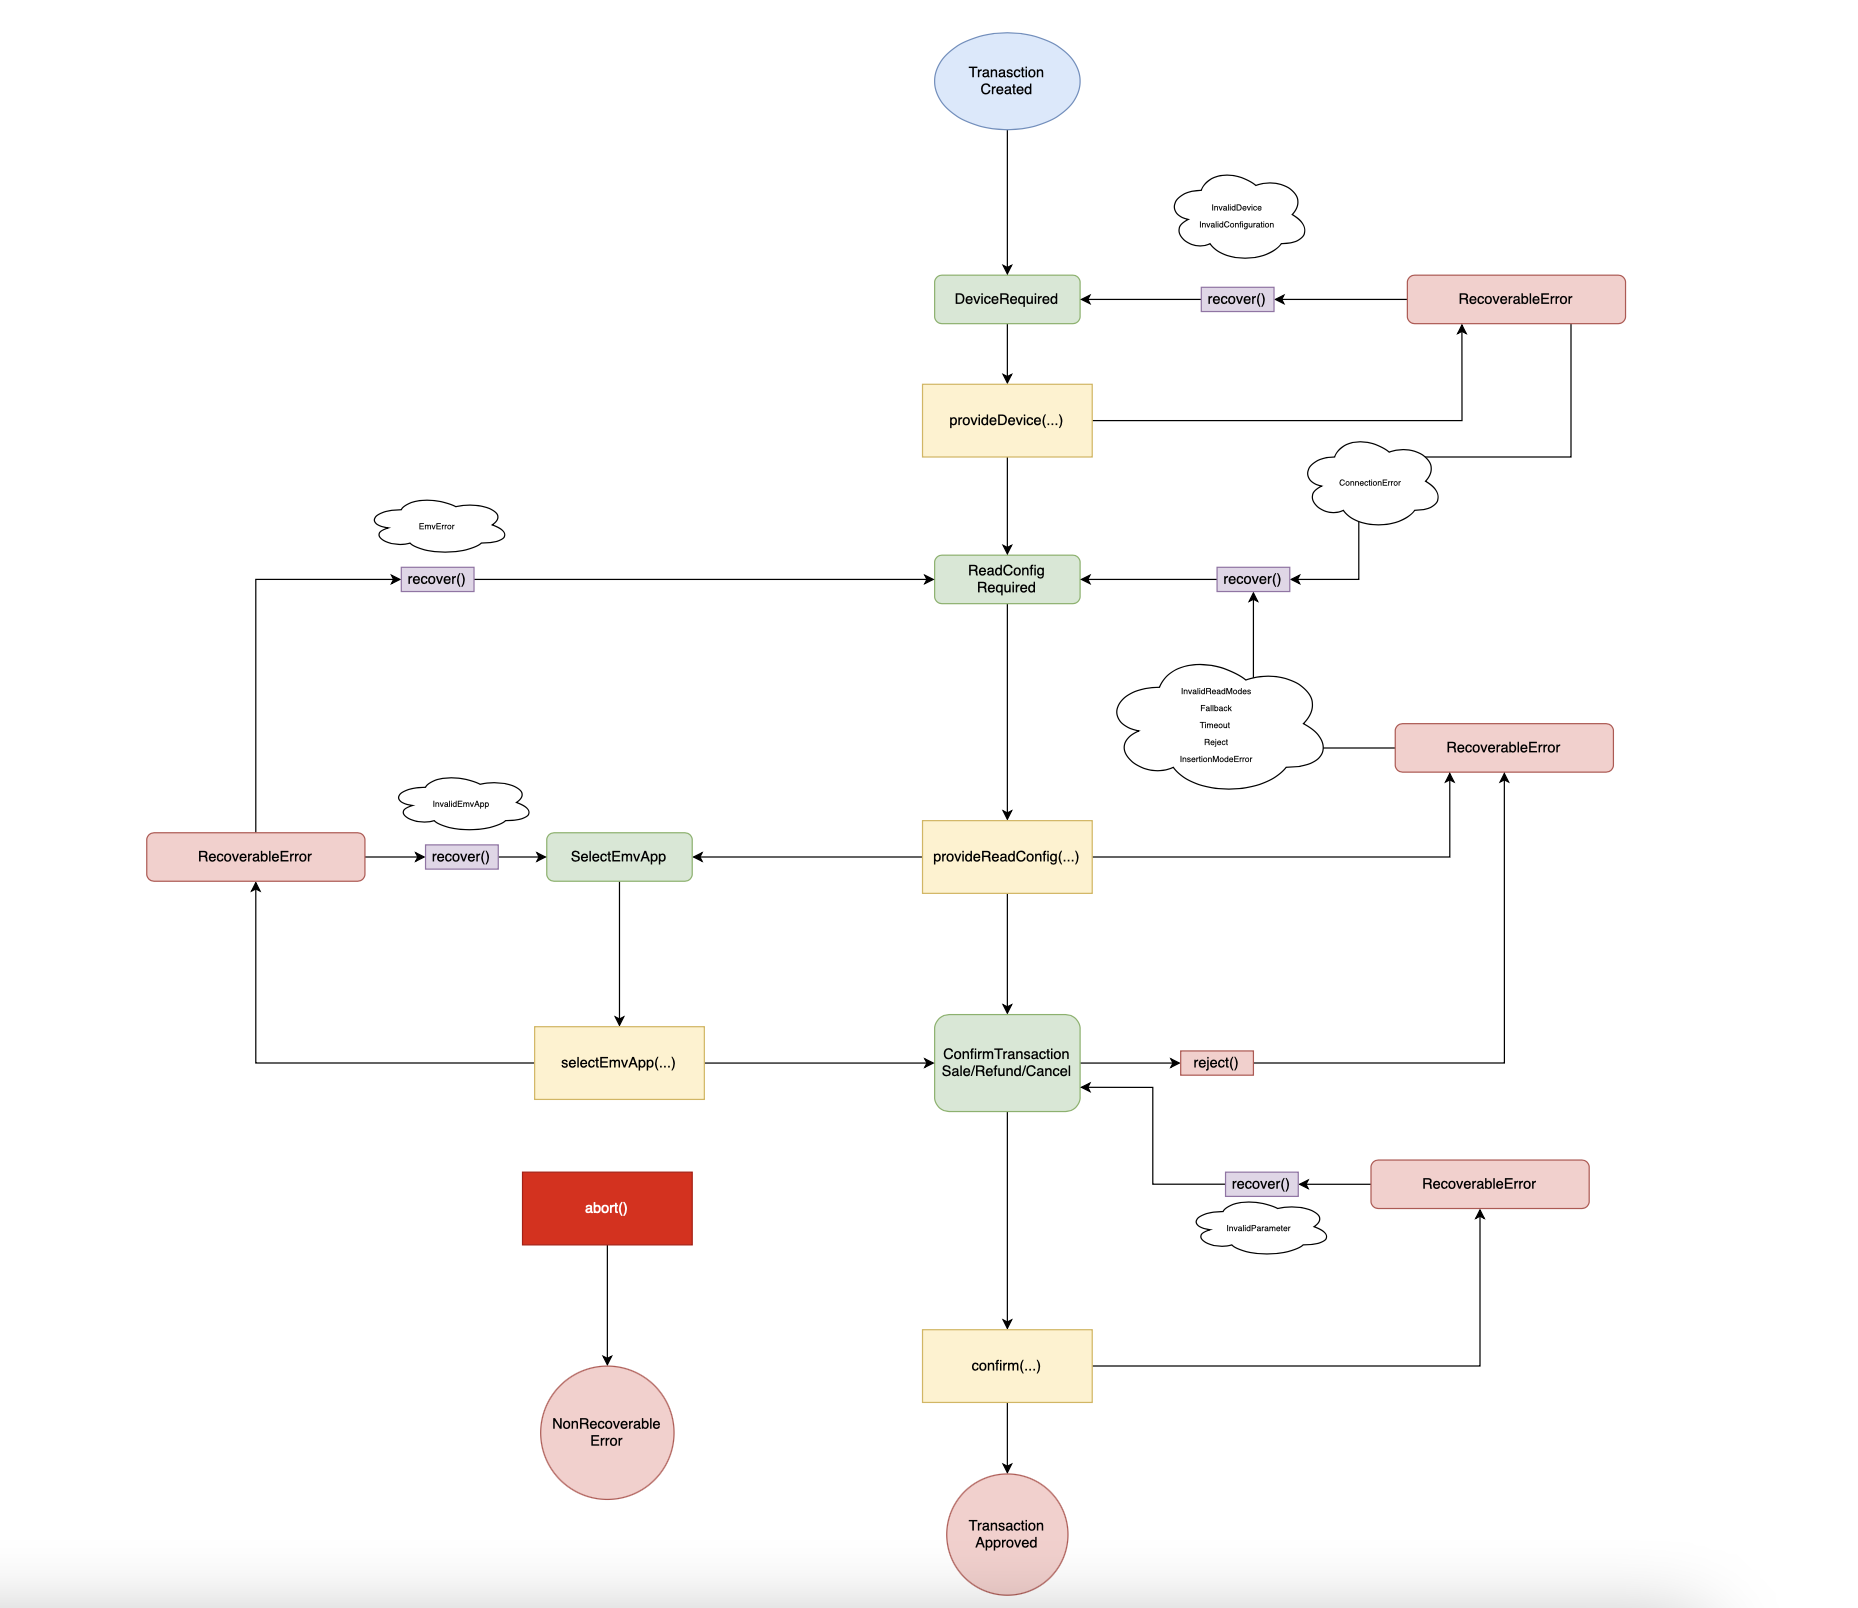
Provide a device
Provide a device which was previously scanned.
Call the method transaction.provideDevice() in TransactionStates.DeviceRequired state
async provideDevice(readerId: ReaderId|string): Promise<void>
  const onTransactionStateChanged = (transaction: Transaction, state: TransactionStates, params) => {
     switch (state) {
        case TransactionStates.DeviceRequired:
            transaction.provideDevice(reader.id)
            break
     }
  }
Provide reader configuration
Create a ReadConfig object and call the method transaction.provideReadConfig() in TransactionStates.ReadConfigRequired state.
async provideReadConfig(config: ReadConfig): Promise<void>
  function readConfigSampleData(): ReadConfig {
      return  {
          timeoutInMillis: 60000,
          readModes: [CardReadModes.Chip, CardReadModes.Swipe, CardReadModes.Nfc],
          cardInsertionStatus: CardInsertionStatuses.NotInserted,
          transactionTotals: { amount: 10000, currency: Currencies.ARS },
      }
  }

  const onTransactionStateChanged = (transaction: Transaction, state: TransactionStates, params) => {
      switch (state) {
          case TransactionStates.ReadConfigRequired:
              transaction.provideReadConfig(readConfigSampleData())
              break
      }
  }
Select EMV app
Some cards have multiple EMV applications embedded within the chip. This feature allows the card to function as multiple logical cards within a single physical card, such as combining a credit card and a debit card.
In such cases, the Readers SDK provides a list of available applications, and you need to select the desired application to proceed. This step is not necessary if the card has only one EMV application.
Call the method transaction.selectEmvApp() in TransactionStates.SelectEmvApp state.
async selectEmvApp(appName: string): Promise<void>
  const onTransactionStateChanged = (transaction: Transaction, state: TransactionStates, params) => {
      switch (state) {
          case TransactionStates.SelectEmvApp:
              const emvApps = params['availableEmvApps']
              transaction.selectEmvApp(emvApps[0]['appName'])
              break
      }
  }
Confirm the transaction
Once the card is read, the Readers SDK provides the card data to the user. The user can then decide whether to confirm or reject the transaction based on this data. After the user's decision, online processing is carried out.
Upon completion of the online processing, you will receive a response indicating whether the transaction was approved, declined, or if an error occurred. For further details on the data required to confirm the transaction, please refer to the required data section.
Confirm a sale
async confirmSaleTransaction(confirmationData: SaleConfirmation): Promise<void>
  const onTransactionStateChanged = (transaction: Transaction, state: TransactionStates, params) => {
      switch (state) {
          case TransactionStates.ConfirmTransactionSale:
              transaction.confirmSaleTransaction(confirmationSaleSampleData())
              break
      }
  }
Confirm a refund
async confirmRefundTransaction(confirmationData: RefundConfirmation): Promise<void>
  const onTransactionStateChanged = (transaction: Transaction, state: TransactionStates, params) => {
      switch (state) {
          case TransactionStates.ConfirmTransactionRefund:
              transaction.confirmRefundTransaction(confirmationRefundSampleData())
              break
      }
  }
Confirm a cancel
async confirmCancelTransaction(confirmationData: CancelConfirmation): Promise<void>
  const onTransactionStateChanged = (transaction: Transaction, state: TransactionStates, params) => {
      switch (state) {
          case TransactionStates.ConfirmTransactionCancel:
              transaction.confirmCancelTransaction(confirmationCancelSampleData())
              break
      }
  }
Transaction approved
Check for TransactionStates.TransactionApprovedSale state.
  const onTransactionStateChanged = (transaction: Transaction, state: TransactionStates, params) => {
      switch (state) {
          case TransactionStates.TransactionApprovedSale:
              // Approved sale
              break
      }
  }
Transaction errors
During a transaction, two types of errors can occur: recoverable errors and non-recoverable errors.
For recoverable errors, it is possible to retry the transaction by calling the associated callback function. This allows you to make another attempt to complete the transaction.
However, for non-recoverable errors, the transaction is considered finished, and it becomes necessary to create a new transaction from scratch if desired. These errors indicate that the transaction cannot be retried or resumed, and a fresh transaction must be initiated.
Call the method transaction.recoverFromError() in TransactionStates.RecoverableError state
  const onTransactionStateChanged = (transaction: Transaction, state: TransactionStates, params) => {
  switch (state) {
    case TransactionStates.RecoverableError:
      transaction.recoverFromError()
      break
    case TransactionStates.NonRecoverableError:
      console.log('Non-recoverable error. Transaction finished')
      break
  }
}